Even though we live in a time when technology rarely fails us, there are still some annoying flaws that exist on platforms we use every day. Fortunately, developers are aware of this, and they are creating shortcuts and helpful tools in order to help us. In this article, we will explore how to update cached links on Facebook with the Facebook Debugger tool.
What is the Facebook Debugger tool and when can we use it?
The Facebook debugger tool was initially designed for developers to troubleshoot issues quickly. Somehow, in the past few years, it has become a tool for social media managers due to its handiness in fixing content we can’t share properly.
Even if you are not a social media manager, we are sure that you have experienced the frustration of a link you want to share on Facebook showing a different image than the one in the original article. There are also cases when Facebook won’t show any kind of preview, and you just share a simple URL that no one will ever click.
The Facebook debugger tool was created with the aim to fix problematic link previews and let us share blog posts with their featured images. It helps our audience to identify the content and gives us more views, likes, and shares. Who can say no to that?
If you are wondering how to use the Facebook debugger and where to find it, wait for a second, it will be explained in the next paragraph. Just give us a minute to remind you of MavSocial’s latest update that can also help you make your shared posts look more beautiful.
Bonus Tip: Remove the messy-looking URLs from Facebook Posts
There is also some great news from Mavsocial related to those messy-looking URLs in Facebook posts. In our June 2020 update, we added the ability to remove those long and ugly URLs from your Facebook posts. You can decide to leave them there, but you now also have the option to remove those links and to keep the content beneath. How sweet is that?
How to use the Facebook Debugger
Firstly, I must say that the Facebook debugger is not a complicated tool. Everyone can use it. It doesn’t matter if you are a small business owner, blogger, or student who writes occasionally. There are just a few steps to refresh your link and make it suitable for sharing among your friends, colleagues, and wider audience.
The first step is to copy the link you would like to share and go to the Facebook debugger website. You can find the Debugger on the Facebook developer site under Tools & Support. Once you’ve navigated to the Debugger, you will see this page.
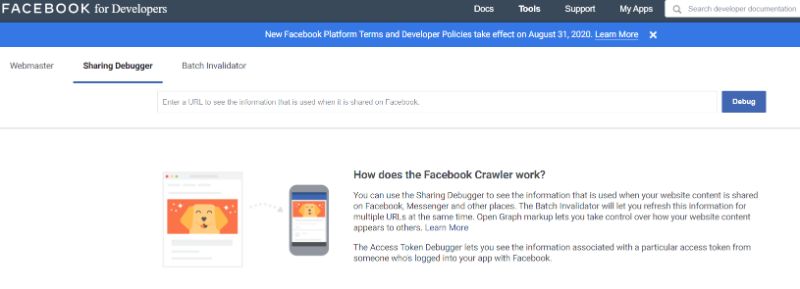
In order to crawl the post, just paste its URL and click the blue button debug. When you do that, the Facebook Debugger will lead you to a page where you will see what is wrong with your link. It will show you why there is a problem. In the section called “Warnings That Should Be Fixed” you will get possible mistakes and solutions.
There are a few mistakes that are most common: Inferred property, Extraneous property, Share App ID Missing, and Parser Mismatched Metadata. Here is the short explanation for each one of those:
- Inferred Property – Inferred Property errors mean that you probably have multiple image sets for your post. It can also mean that Facebook couldn’t locate the image. If you have multiple image properties, Facebook will guess which one you would like.
- Extraneous Property – This warning is showing that one of your website’s Open Graph properties has depreciated. It can also mean that the Debugger doesn’t recognize it. The warning will show exactly which Open Graph property is the cause of this trouble.
- Share App ID Missing – You’ll see this error just if you integrate a separate app with Facebook. This warning tells you that you didn’t set the app_id property, and you should change that on your website before you share the link.
- Parser Mismatched Metadata – This error comes from small mistakes like spaces between letters or date formats, and the Debugger tool shows you exactly which one you should fix.
What To Do When You Post A Link Without Image?
Sometimes we just share the post and then find out that it didn’t have the image we wanted it to have. In case that happens, there is a useful tip for that mistake. Usually, you will need to force Facebook to remove the cache. Int his case, you should follow these steps:
- Go to ‘Publishing Tools’ on your Facebook Page.
- Under ‘Published Posts’, find the post that is problematic and click on it.
- Click those three horizontal dots in the corner of your post ‘…’.
- Choose ‘Refresh share attachment’.
- A pop-up window should open. If the new information is good, click ‘Save.’

Wrap Up
All in all, the Facebook Debugger tool will help you find and resolve mistakes made on your website and show you once again how important it is to remove all layers of cache. With the help of this tool and a good social media management platform, you will be able to create shareable posts with the proper images. We hope that we have helped you with this article and if you think that this article will help your coworkers or friends, share this article with them.